|
|
|
| BASIC STRATEGY ADVICE |
|
This introduction on strategy is designed to be read after you have played a few games. For convenience, it is assumed that you are playing a two-player game. Even though 3-4 player games require similar strategies, the luck factor is more significant in those games, hence strategic aspects apply to a lesser extend.
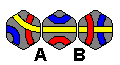
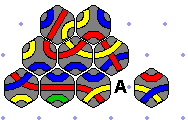
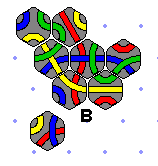
Connecting indirectly Always try to connect indirectly to your line! Each direct connection adds just one tile to your score, while an indirect connection adds two. The diagram below shows an indirect red line that will be five points long once tiles have been played at A and B. Initially indirect connections are certain to eventually connect directly. However, this is less likely towards the end of the game, as all of the tiles which fit may have already been played elsewhere. Five-point indirect red line |
||
|
Forced Spaces The most important concept in the game is the forced space rule. Learn to exploit this concept which allows you to play more than one tile per turn, and even force your opponents to play their tiles in places which are good for you. Fill your forced spaces in an order that serves you best. Postpone any undesirable forced spaces until last, in case you pick up tiles which allow other options. Note that forced spaces still have to be filled during the endgame! What is a forced space? Any empty space which is surrounded by three tiles is called a forced space (they are indicated by a coloured dot). Each player must start their turn by filling forced spaces whenever possible. A little arrow next to a tile tells you this tile fits into a forced space! Forced spaces become more common as the game progresses and allow a player to play a number of tiles in one turn. It is a normal procedure to create forced spaces deliberately, especially when you're forcing yourself to fill the just-built space. 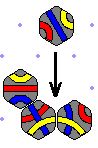 |
||
|
Controlled Sides The long arrow in the diagram below shows a controlled side. The restriction rules forbid playing tiles along a controlled side while any tiles remain in the bag. The forced space at A must be filled first, then B must be filled, then C etc. before further tiles can be played along the side. Controlled sides are displayed in the applet through greyed spaces. 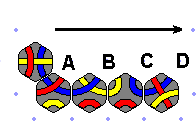
|
||
|
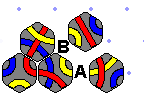
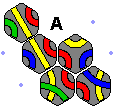
Small loops In the beginning try to force your opponent into small loops. This wastes their valuable tiles and makes it harder for your opponent to form a long line later on. The diagram below shows Red forced into a small loop which will waste four tiles. Small four-tile loop If you play carefully, it's almost always possible to avoid being forced into an early loop. In the next diagram, the three red tiles already connected don't appear to be in danger of being forced into a small loop. However, there is a very real threat if Yellow has the right tiles. The tile being played at position A will force a second tile at position B. Suddenly Red has a seven-tile loop and it will be almost impossible to win the game from here (the average winning score is around 23). Small seven-tile loop |
||

|
Isolated lines Normally try to develop only one long line. Late in the game it will be very difficult to connect two isolated lines together. For this reason it is worthwhile putting considerable effort into isolating your opponent's lines. The diagram below shows two red lines which Yellow can further isolate by playing the given tile at A. Two isolated red lines |
||
|
Medium-sized and big loops A line which two ends join together is called a loop and scores double points. However, as loops cannot be further enlarged, small loops are to be avoided! When your line length gets into double fiqures, consider converting it into a loop. In a typical game the winning score is around 23 points, so a loop of twelve tiles would give a good chance to win. Large loops are rare between good players, but just maintaining the threat of a loop will force your opponent to waste valuable tiles defending. The diagram shows a red loop which goes through nine tiles so it scores 18 points - a marginal score to win a game. 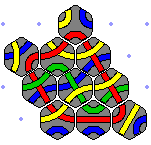 |
||
|
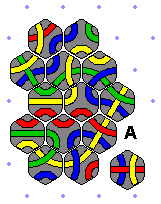
Counting remaining tiles As the end of the game approaches, it is important to check whether specific tiles that you or your opponent need are still in the bag. Any forced space can be filled by six tiles with the exception that if a forced space has three different colours, then only five tiles will fit the space. The diagram shows a board with a yellow/red/red forced space at A. Look carefully and you'll see that four of the six tiles which would have fit at A have already been played. This means that there are only two tiles left in the bag to fill this forced space. Towards the end of the game, players should put their efforts into filling any missing indirect connections, rather than trying to increase their potential line. Counting remaining tiles which fit a forced space |
||
|
Blocking The end of a line is considered blocked when it's impossible to add another tile to it (no remaining tiles fit the space at the end of the line). There are two ways to block your opponent's line:
|
||
|
Lookalike forced spaces If there is a forced space that your opponent badly needs filled, you can reduce his or her chances of filling this space by creating a "lookalike" forced space which requires the same colour sequence as the original forced space. If your opponent happens to pick up the crucial tile, he or she will place it into the original forced space, that's for sure! But what happens if you pick it up? You'll have the option of playing the tile in the lookalike, leaving your opponent waiting for another tile. This is particularly important towards the end of the game when wasting a tile may mean that none are left to fill a particular forced space. In the example shown, Yellow can reduce Red's chance of filling the forced space by creating a lookalike somewhere else. This gives Yellow a chance to waste a tile if he or she draws it from the bag. Counting remaining tiles and mastering the lookalike tactic is one of the keys to becoming a real Tantrix expert! 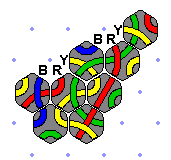 |
||
|
The Tiles Tantrix consists of 56 different tiles, however, ignoring colours there are just four different shapes known as Single Intersection, Bridge, Chinese Character and Roundabout. The abbreviated tile names and their images are:  Blocking when no tiles are left The three restriction rules are lifted once all tiles have been taken from the bag, and it becomes easy to block a player's line. Try to arrive at this stage of the game with both ends of your line unblocked. If your opponent's line has only one free end, you should put all your effort into blocking it. Try to be the player who will have the first free move once the restriction rules are lifted. The diagram shows how easy it is to block a player's line; by placing the tile as shown, Red's line will now be permanently blocked at B. Once you've successfully blocked your opponent's line, use your last few tiles to extend your own line. Permanently blocking Red's line For further reading have a browse through Dave Dyer's Tantrix hints. If you have put together your own thoughts on Tantrix strategy, we would love to hear them! |
||
| Home | Site Map | Products | Play Online | Buy Tantrix | About Us | Contact Us |
© Copyright 2018, Colour of Strategy Ltd, Pohara, New Zealand. All rights reserved. Last update: April, 2018 |